Dimensional tolerances
Precision cold-rolling technology is a core competence of Lamineries MATTHEY and our guaranteed dimensional tolerance limits are often tighter than stipulated in the respective European standards.
Definitions

The guaranteed camber is usually indicated in mm/m and is dependent on the thickness and width of the strips. Other guaranteed cambers can be calculated for other gauge lengthes (see edgewise curvature of non-ferrous strips or edgewise curvature of steels and maraging steels).
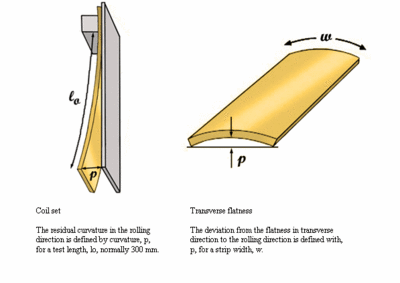
Flatness
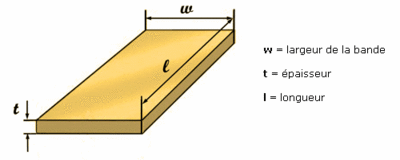
Width
Standard tolerances for slit edge strips of Lamineries MATTHEY are + 0.2, -0 (or ± 0.1mm on request) for all widths of < 125 mm and thicknesses of < 1.00 mm. Tighter tolerances are possible on request.
Camber, edgewise curvature
For standard tolerances, the following requirements are met (reference length 1000 mm). High precision tolerances are possible on request.
Width [mm] | Camber, edgwise curvature, d [mm/m] | ||||
LMSA standard | LMSA precision | ||||
| > | ≤ | ≤ 0.5 mm | > 0.5 mm | ≤ 0.5 mm | > 0.5 mm |
| 3 | 6 | 12 | - | 6 | - |
| 6 | 10 | 8 | 10 | 4 | 5 |
| 10 | 20 | 4 | 6 | 2 | 3 |
| 20 | 250 | 2 | 3 | 1 | 1.5 |
Other guaranteed cambers can be calculated for other gauge lengthes using the following equation:
d = guaranteed camber, given in the table for a gauge, l0, of 1m.
d2 = calculated edgewise curvature in mm for a gauge, l2.
d2 [mm/m] = d [mm] x (l2 [mm] / 1000)2
Thickness
The standard tolerances of Lamineries MATTHEY correspond with the tightest tolerances (precision) prescribed in European standards. The precision and extremely tight tolerances (on request) allow the production of premium quality parts. The dimensional tolerances listed in the table below refer, among others, to all copper, aluminium and nickel alloys, except for NiCr20, NiMo16Cr15W, NiMo28.
Width (mm) | EN Standards | Lamineries Matthey SA | ||||
| ≥ | < | 10140 precision | 10258 precision | LMSA standard | LMSA precision | LMSA extrem |
| 0.025 | - | - | - | - | ± 0.001 | |
| 0.025 | 0.050 | - | - | ± 0.003 | ± 0.002 | ± 0.0015 |
| 0.050 | 0.065 | - | ± 0.003 | ± 0.003 | ± 0.0025 | ± 0.002 |
| 0.065 | 0.100 | - | ± 0.004 | ± 0.004 | ± 0.0035 | ± 0.003 |
| 0.100 | 0.125 | ± 0.005 | ± 0.006 | ± 0.005 | ± 0.004 | ± 0.003 |
| 0.125 | 0.150 | ± 0.005 | ± 0.006 | ± 0.005 | ± 0.005 | ± 0.004 |
| 0.150 | 0.250 | ± 0.010 | ± 0.008 | ± 0.008 | ± 0.006 | ± 0.004 |
| 0.250 | 0.300 | ± 0.010 | ± 0.009 | ± 0.009 | ± 0.007 | ± 0.005 |
| 0.300 | 0.400 | ± 0.010 | ± 0.010 | ± 0.010 | ± 0.007 | ± 0.005 |
| 0.400 | 0.500 | ± 0.015 | ± 0.012 | ± 0.012 | ± 0.008 | ± 0.006 |
| 0.500 | 0.600 | ± 0.015 | ± 0.014 | ± 0.014 | ± 0.010 | ± 0.007 |
| 0.600 | 0.800 | ± 0.015 | ± 0.015 | ± 0.015 | ± 0.010 | ± 0.007 |
| 0.800 | 1.000 | ± 0.015 | ± 0.018 | ± 0.018 | ± 0.012 | ± 0.009 |
| 1.000 | 1.200 | ± 0.020 | ± 0.020 | ± 0.020 | ± 0.015 | ± 0.012 |
| 1.200 | 1.250 | ± 0.020 | ± 0.020 | ± 0.020 | ± 0.015 | ± 0.012 |
| 1.250 | 1.500 | ± 0.020 | ± 0.020 | ± 0.020 | ± 0.015 | ± 0.014 |
Width
Standard tolerances for slit edge strips of Lamineries MATTHEY are + 0.2, -0 (or ± 0.1mm on request) for all widths of < 125 mm and thicknesses of < 1.00 mm. Tighter tolerances are possible on request.
Camber, edgwise curvature
For standard tolerances, the following requirements are met (reference length 1000 mm). High precision tolerances are possible on request.
Width [mm] | Camber, edgwise curvature, [mm/m] | ||||
LMSA standard | LMSA extrem | ||||
| > | ≤ | ≤0.5 mm | > 0.5 mm | ≤ 0.5 mm | > 0.5 mm |
| 3 | 6 | 12 | - | 6 | - |
| 6 | 10 | 8 | 10 | 4 | 5 |
| 10 | 20 | 4 | 6 | 2 | 3 |
| 20 | 250 | 2 | 3 | 1 | 1.5 |
Other guaranteed cambers can be calculated for other gauge lengthes using the following equation:
d = guaranteed camber, given in the table for a gauge, l0, of 1m.
d2 = calculated edgewise curvature in mm for a gauge, l2.
d2 [mm/m] = d [mm] x (l2 [mm] / 1000)2
Thickness
The standard tolerances of Lamineries MATTHEY correspond with the tightest tolerances (precision) prescribed in the respective European standards. The precision and extremely tight tolerances (on request) allow the production of parts of premium quality. The dimensional tolerances listed in the table below refer, among others, to all unalloyed steels, stainless steels, maraging steels and Phynox, as well as certain special products.
Thickness (mm) | EN Standards | Lamineries Matthey SA | ||||
| ≥ | < | 10140 precision | 10258 precision | LMSA standard | LMSA precision | ±LMSA extrem |
| 0.025 | - | - | - | - | ± 0.001 | |
| 0.025 | 0.050 | - | - | ± 0.003 | ± 0.002 | ± 0.0015 |
| 0.050 | 0.065 | - | ± 0.003 | ± 0.004 | ± 0.003 | ± 0.002 |
| 0.065 | 0.100 | - | ± 0.004 | ± 0.006 | ± 0.004 | ± 0.003 |
| 0.100 | 0.125 | ± 0.005 | ± 0.006 | ± 0.008 | ± 0.006 | ± 0.003 |
| 0.125 | 0.150 | ± 0.005 | ± 0.006 | ± 0.008 | ± 0.006 | ± 0.004 |
| 0.150 | 0.250 | ± 0.010 | ± 0.008 | ± 0.010 | ± 0.008 | ± 0.004 |
| 0.250 | 0.300 | ± 0.010 | ± 0.009 | ± 0.012 | ± 0.008 | ± 0.005 |
| 0.300 | 0.400 | ± 0.010 | ± 0.010 | ± 0.012 | ± 0.009 | ± 0.005 |
| 0.400 | 0.500 | ± 0.015 | ± 0.012 | ± 0.015 | ± 0.010 | ± 0.006 |
| 0.500 | 0.600 | ± 0.015 | ± 0.014 | ± 0.020 | ± 0.012 | ± 0.007 |
| 0.600 | 0.800 | ± 0.015 | ± 0.015 | ± 0.020 | ± 0.014 | ± 0.007 |
| 0.800 | 1.000 | ± 0.015 | ± 0.018 | ± 0.025 | ± 0.015 | ± 0.009 |
| 1.000 | 1.200 | ± 0.020 | ± 0.020 | ± 0.025 | ± 0.018 | ± 0.012 |
| 1.200 | 1.250 | ± 0.020 | ± 0.020 | ± 0.030 | ± 0.020 | ± 0.012 |
| 1.250 | 1.500 | ± 0.020 | ± 0.020 | ± 0.035 | ± 0.025 | ± 0.014 |
Diameter
Usual tolerances | Special tolerances | ||
| ≤ 3.0 mm | h8 | + 0 / - 14 µm | On request, rods and wires can be delivered with lower tolerances (h6, h5, h7) by means of additional drawing or grinding processes. |
| > 3.0 et ≤6.0mm | h8 | + 0 / - 18 µm | |
| > 10.0 et ≤ 10.5mm | h8 | + 0 / - 22 µm | |
| > 10.5 et ≤ 18.0mm | h9 | + 0 / - 43 µm | |
| > 18.0 et ≤ 30.0mm | h9 | + 0 / - 52 µm | |
The heat-treated, non-ground bars are available with tolerances h9 for diameters ≤ 10.5 mm.
ISO Tolerances for rods and wires: click here.


